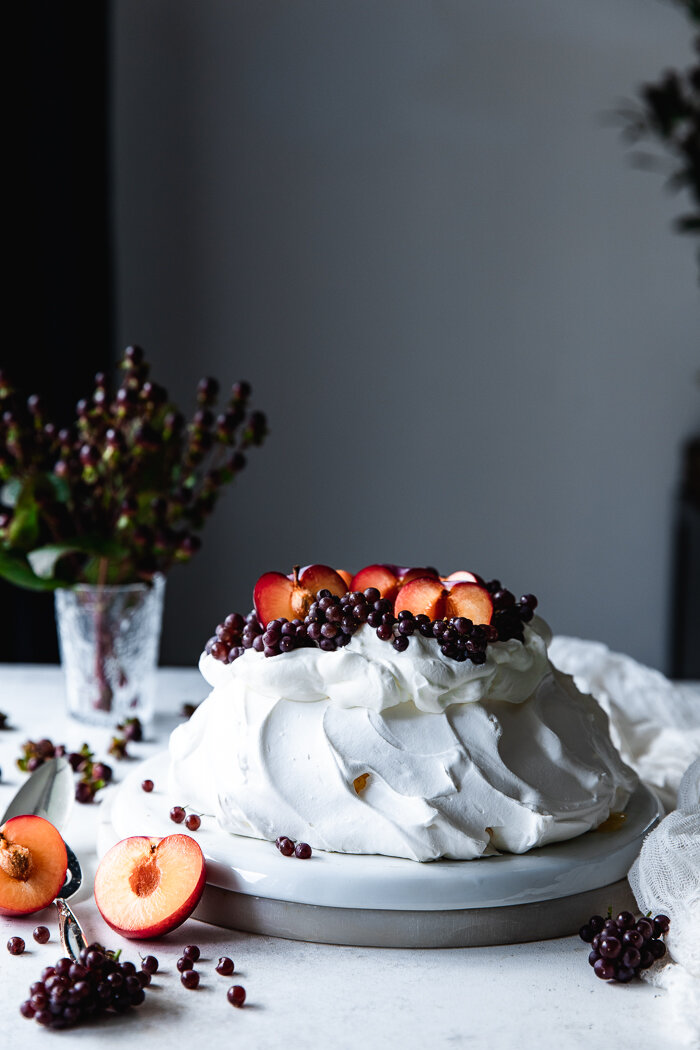
Honey Plum Pavlova


Dessert to Impress
(Update: I updated my original Pavlova post with some new pics and a few tweaks on the recipe itself. Enjoy!)
This airy and chewy Pavlova never fails. Most of the time, the simpler things end up being quite fascinating. This recipe is the perfect example of that. Would you believe a few amount of ingredients and a small amount of effort can culminate in such a beautiful and impressive dessert?
I’m not going to lie. Even if this is delicious, I love to make this because it looks so beautiful! It’s airy, playful and graceful, as the ballerina who gave the name to it: Anna Pavlova. The story goes that a restaurant in New Zealand created the dessert for her when she was visiting that country for a tour.
But don’t be fooled. As beautiful as it looks, this dessert is so easy to make. I have made it even in crazy hectic weekends, when I squeezed 20 minutes to go into the kitchen with my daughter to whip this in no time. I think it’s somehow daunting because you have to be careful of certain details. Also, it could take almost 3 hours from start to finish and I think this could be intimidating. But active time is less than 15 minutes, most of the time i’ts in the oven. Plus let’s face it, the mixer is the one doing most of the work! This pavlova recipe is slightly based on the Ina Garten’s Pavlova with cream and berries recipe.
It’s a chic, nonchalant and unpretentious confection. Fresh fruits go perfectly with it.
Recipe notes
Separate the eggs when they are cold, then bring the whites to room temperature. It’s much easier to separate eggs when they are cold but the whites will grow more when they are beaten at room temperature.
If using natural raw sugar you’ll need to pulse it in the food processor to make the granules finer. About 10 pulses of 10 seconds each should be enough.
Treat the egg whites carefully after they are frothy and firm.
It’s important to let the meringue cool down in the oven because a drastic change in temperature can cause the meringue to deflate and slightly change its color.
You can make the meringue in advance up to three days, stored in a sealed container or wrapped in aluminum foil, then ensemble when ready to serve.


Honey Plum Pavlova
Ingredients
Pavlova
◯ Egg whites, at room temperature – 4 from medium to large eggs
◯ Caster sugar or natural granulated sugar – 1 cup (if using natural granulated sugar remember to pulse it in the food processor until very fine but not pulverized)
◯ Cornstarch – 3 Tsp
◯ Vanilla extract – ½ Tsp
◯ Freshly squeezed lemon juice – ½ Tsp
◯ White vinegar - ½ Tsp
◯ Lemon wedge to wipe the bowl and whisk attachment
Whipped Cream
◯ Heavy cream, chilled – 1 cup
◯ Raw sugar – 1 TBSP
◯ Confectioner’s sugar – 1 TBSP
◯ Vanilla extract – 1 Tsp
Honey Plums
◯ Plums, halved – 3
◯ Brown sugar – 6 TBSP
◯ Honey to drizzle
Details
Total time:
3 hours
Active time:
15 minutes
Equipment:
parchment paper, stand up mixer, rubber spatula
Steps
To make the meringue:
Preheat oven to 180°.
Using a pencil, draw an 8” or 9” circle in a parchment paper. Turn the paper over so the draw-on side is facedown but still visible. Place it in a baking sheet.
Place the egg whites and salt in the bowl of an electric mixer with the whisk attachment in place. Beat the whites in high speed (level 6 in the KitchenAid) until frothy and firm, about 1 minute. With the mixer still in high slowly add the sugar and beat for an extra 2 minutes, until shiny peaks form.
Remove the bowl from the mixer and sift the cornstarch on top. Add the vanilla and the vinegar and using a rubber spatula fold lightly and gently into the egg whites. Pile the meringue inside the circle of the parchment paper and smooth to even out.
Bake for 1 ½ hours, then turn the oven off and let the meringue in for about 50 minutes more.
Very gently peel the meringue from the parchment paper. Top with whipped cream and the honey plums (recipes follow) or any of your favorite seasonal fresh fruits.
To make the whipped cream:
Using a whisk or in a standup mixer fitted with the whisk attachment whip the cream until frothy. Add the sugar and vanilla and continue whipping until light and firm.
To make the honey plums:
Preheat oven to 450°.
Place the plums in a baking sheet. Rub each half of the plums with 1 tablespoon of the sugar. Drizzle with some honey, about a tablespoon each. Bake for 15 to 20 minutes, depending on the desired consistency.
